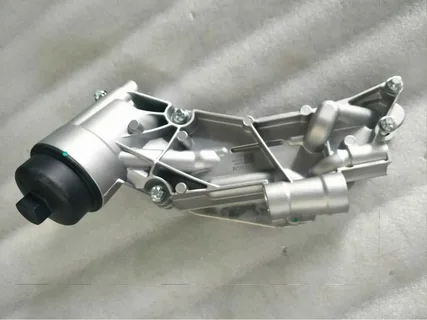
The 1.8 Cruze Oil Cooler plays a critical role in maintaining your vehicle’s engine’s optimal performance and longevity. If you are experiencing problems with your Chevrolet Cruze’s oil cooler, it’s essential to address them promptly to avoid further damage and costly repairs. In this blog post, we will explore the common issues associated with the Cruze Oil Cooler, including how to diagnose, troubleshoot, and prevent these problems from occurring in the future. Some of the most frequent issues include oil leaks, cooler clogging, and inefficient cooling performance.
Understanding the Role of the Oil Cooler
An oil cooler is essential in many vehicles, especially those operating under high-performance or demanding conditions. Its primary role is to help regulate the temperature of engine oil, ensuring it remains within an optimal range. Doing so prevents the engine from overheating and maintains the oil’s ability to lubricate and protect the engine’s internal components effectively.
Oil, as it circulates through the engine, absorbs significant heat. This is because it not only lubricates moving parts but also assists in cooling them down. If the oil becomes too hot, it can break down and lose effectiveness, leading to increased engine wear and potential failure. The oil cooler steps in as a heat exchanger, similar to a radiator. It directs the hot oil through a series of tubes or fins, allowing heat to dissipate into the surrounding air or coolant before the oil returns to the engine.
Oil coolers are particularly important in vehicles that experience heavy loads, such as towing or high-performance driving, where engine temperatures can spike. In these situations, the oil cooler helps maintain the engine’s efficiency and longevity by ensuring the oil doesn’t overheat. A well-lubricated engine operates more smoothly, improving fuel economy and reducing emissions.
In conclusion, the oil cooler is vital in maintaining an engine’s health, particularly under harsh driving conditions. Managing oil temperature ensures that the engine operates efficiently, reducing wear and prolonging its lifespan. Regular maintenance, including checking for leaks or blockages, is essential to maintain the oil cooler properly.
Symptoms of a Failing Oil Cooler
The oil cooler plays a crucial role in maintaining the temperature of engine oil, ensuring efficient lubrication and preventing engine overheating. Several symptoms can appear when an oil cooler starts to fail, signalling potential issues.
1. Oil Leakage
Oil leakage is one of the most obvious symptoms of a failing oil cooler. Over time, cracks or damage to the cooler’s seals can cause oil to escape, leaving visible puddles under the vehicle. This can lead to low oil levels, which in turn causes poor engine performance.
2. Engine Overheating
A malfunctioning oil cooler can lead to excessive engine heat, as it can no longer efficiently cool the oil. You might notice the temperature gauge rising above normal levels or even the engine warning light coming on. Overheating can cause severe engine damage if left unresolved.
3. Contaminated Oil
Coolant can mix with engine oil when an oil cooler fails internally, producing a milky substance in the oil reservoir. This oil contamination compromises lubrication and increases the risk of engine damage.
4. Decreased Engine Performance
Low oil pressure or overheated oil may result in sluggish engine performance. You may notice reduced power, rough idling, or strange noises from the engine, such as knocking or ticking sounds.
5. Smoke from Exhaust
A faulty oil cooler can cause oil to leak into the combustion chamber, resulting in white or bluish smoke from the exhaust. This indicates oil burning alongside fuel, which can further harm engine components.
Diagnosing Oil Cooler Issues
The oil cooler is a vital component in an engine’s cooling system, responsible for maintaining optimal oil temperature to prevent overheating and maintain lubrication. When it fails, engine performance can suffer, potentially leading to severe damage. Here’s how to diagnose common oil cooler issues:
1. Symptoms of Oil Cooler Failure
One of the first signs of an oil cooler issue is engine overheating, which occurs when the cooler can’t properly dissipate heat. You may also notice oil leakage around the cooler or cooling system. Discoloured oil (milky white) could indicate oil and coolant mixing, usually from a damaged oil cooler. A decrease in oil pressure is another red flag.
2. Visual Inspection
Perform a visual inspection of the oil cooler and its connections. Check for signs of physical damage, oil leaks, or clogged cooling fins. Ensure that the cooler isn’t blocked by debris, which can restrict airflow and cause inefficient cooling.
3. Testing the Oil Cooler
Pressure testing the cooler can reveal internal leaks. Using a pressure tester, you can check for any pressure drops that indicate a breach in the cooler’s internal structure. Also, test the coolant for oil contamination and inspect the oil for coolant traces.
4. Repair or Replace?
If a fault is detected, replacement is usually the most reliable solution. Addressing oil cooler issues promptly is crucial to avoid engine damage or costly repairs.
Troubleshooting the Engine Oil Cooler Holden Cruze
The engine oil cooler in a Holden Cruze plays a crucial role in maintaining the engine’s optimal temperature by reducing the oil temperature. If the oil cooler fails, it can lead to engine overheating, poor performance, and even damage. Troubleshooting issues related to the oil cooler involves identifying common symptoms and following a structured diagnosis.
Common Symptoms of Oil Cooler Failure Signs of a failing Engine Oil Cooler Holden Cruze include visible leaks, especially around the oil cooler housing. If the oil is mixed with coolant, you may notice a milky, frothy substance in the reservoir, indicating a coolant-oil mix. Overheating of the engine is another symptom, as the oil cooler’s primary function is to help dissipate heat. The check engine light may also come on, signalling a temperature issue. Reduced engine performance and an unusual burning oil smell could also point to oil cooler problems.
Diagnosis Steps Start by inspecting the oil cooler for any visible leaks or damage. If there are signs of oil leakage or coolant contamination, clean the area and confirm the source. Checking the hoses and connections for cracks or wear is also essential. If you suspect oil and coolant mixing, inspect the radiator and reservoir for the aforementioned milky substance.
Repair or Replace Once diagnosed, repairs may involve replacing the cooler, hoses, or seals. If the oil cooler is damaged beyond repair, it’s often more practical to replace it entirely. Be sure to flush the oil and coolant systems to remove any contaminants before installing a new oil cooler. Always use high-quality replacement parts to ensure longevity and avoid future failures.
How to Replace a Faulty Oil Cooler?
Replacing a faulty oil cooler is essential to prevent engine overheating and maintain proper oil temperatures. Here’s a step-by-step guide to help you replace the oil cooler safely and efficiently.
1. Preparation and Safety
Before starting, ensure the vehicle is parked on a level surface and the engine is completely cool. Disconnect the battery to avoid electrical hazards. Wear gloves and goggles to protect yourself from hot oil and sharp edges.
2. Drain Engine Oil and Coolant
Begin by draining the engine oil and coolant. Locate the oil drain plug and place an oil pan beneath it. Remove the plug to allow the oil to drain completely. Similarly, drain the coolant by opening the drain valve on the radiator or removing the lower radiator hose.
3. Locate and Remove the Oil Cooler
The oil cooler is typically located near the radiator or engine block. Refer to your vehicle’s manual for the exact location. Disconnect the oil lines and hoses leading to the cooler. Be prepared for residual oil to spill during this step. Unbolt the oil cooler from its mounting points and remove it from the vehicle.
4. Install the New Oil Cooler
Install the new oil cooler in place of the old one, ensuring it aligns with the mounting points. Reconnect the oil lines and hoses, ensuring they are securely fastened to prevent leaks. Tighten all bolts to the manufacturer’s recommended torque specifications.
5. Refill Oil and Coolant
Refill the engine with fresh oil and coolant once the oil cooler is securely in place. Use the correct oil grade and coolant type specified for your vehicle. Check for any leaks after refilling.
6. Final Check
Reconnect the battery and start the engine. Allow it to run for a few minutes while monitoring the oil pressure and temperature. Check for any signs of leakage or abnormal engine behaviour.
Preventative Maintenance Tips for the Oil Cooler
An oil cooler is crucial for maintaining optimal engine temperature, especially in high-performance vehicles or hot climates. Regular maintenance ensures the oil cooler operates efficiently, extending the engine’s life. Here are some key preventative maintenance tips for the oil cooler:
1. Inspect for Leaks and Damage
Routinely check the oil cooler for signs of leaks or physical damage. Leaks can occur at connections, hoses, or even within the cooler, leading to low oil levels and engine overheating. Look for oil residue or wet spots around the cooler.
2. Clean the Cooler Fins
Dirt and debris can accumulate on the oil cooler’s fins, restricting airflow and reducing cooling efficiency. To ensure heat dissipation, clean the fins with compressed air or a soft brush. Avoid using high-pressure water, as it may bend the fins.
3. Check the Hoses and Connections
Oil cooler hoses and connections are prone to wear and tear over time. Regularly inspect them for cracks, bulges, or signs of wear, and replace them as necessary. Tighten any loose connections to prevent leaks and ensure proper oil flow.
4. Monitor Oil Temperature
Keep an eye on the oil temperature gauge if your vehicle is equipped with one. Sudden spikes or abnormal temperature readings could indicate a problem with the oil cooler or its components, warranting immediate inspection.
5. Regular Oil Changes
Changing the oil at recommended intervals helps maintain the efficiency of the oil cooler. Old or dirty oil can cause blockages in the cooler, reducing its ability to regulate engine temperature effectively.
Conclusion
Regular inspection and maintenance of the 1.8 Cruze Oil Cooler can significantly extend your vehicle’s engine life and enhance performance. Keeping an eye on symptoms like overheating, oil leaks, and reduced engine power can help you catch issues early. Understanding how to diagnose and troubleshoot problems, from checking for visible damage to using diagnostic tools, is vital for addressing concerns promptly. Proper troubleshooting steps, such as inspecting connections and flushing the cooler, can often resolve minor issues. For more complex problems, professional assistance is advisable.
FAQS
Q: How often should I check my 1.8 Cruze Oil Cooler?
A: Regular inspections are recommended at least once every six months or every oil change to ensure the 1.8 Cruze Oil Cooler is functioning properly.
Q: What should I do if I find an oil leak near the cooler?
A: Inspect the connections and hoses for tightness and damage if you discover an oil leak. If you cannot locate the source of the leak or fix it yourself, seek professional help to prevent further damage.
Q: Can I drive my Cruze if the oil cooler is leaking?
A: It is not advisable to drive with a leaking oil cooler. Leaks can lead to low oil levels and potential engine damage. Address the issue promptly to avoid costly repairs.